
Complete Guide: Self-Hosting Typesense on GCP with Firebase Integration
A Step-by-Step Journey from Zero to Production-Ready Search

Introduction
In the world of modern web applications, search functionality is no longer a luxury—it’s a necessity. Whether you’re building an e-commerce platform, a job management system, or any data-heavy application, users expect fast, intelligent search capabilities.
Enter Typesense: an open-source, typo-tolerant search engine that’s blazingly fast and remarkably easy to use. While services like Algolia offer hosted solutions, self-hosting Typesense on Google Cloud Platform (GCP) gives you complete control, better privacy, and significant cost savings.
In this comprehensive guide, I’ll walk you through:
Setting up Typesense on a GCP VM instance
Configuring SSL/HTTPS with a custom domain
Integrating with Firebase/Firestore using the official extension
Building a production-ready FastAPI backend with full-text search
By the end, you’ll have a robust, scalable search infrastructure ready for production use.
What is Typesense?
Typesense is an open-source search engine optimized for instant search experiences. Think of it as a modern alternative to Elasticsearch, but significantly simpler to set up and maintain.
Key Features
Lightning Fast: Built in C++, Typesense delivers search results in milliseconds, even across millions of documents.
Typo Tolerance: Automatically handles spelling mistakes without complex configuration. Searching for “plumming” will still find “plumbing.”
Faceted Search: Built-in support for filters and faceted navigation, perfect for e-commerce and data exploration.
Geo Search: Native support for location-based searches with distance calculations.
Easy to Use: RESTful API with client libraries for JavaScript, Python, Ruby, PHP, and more.
Production Ready: Powers search for companies like Flatfile, FusionAuth, and thousands of others.
Why Self-Host?
While Typesense Cloud is excellent, self-hosting offers:
Cost Savings: A $10/month VM vs. $29+ for hosted solutions
Data Privacy: Your data never leaves your infrastructure
Customization: Full control over configuration and scaling
Learning: Deep understanding of your search infrastructure
Part 1: Setting Up Typesense on GCP
Prerequisites
Before we begin, ensure you have:
A Google Cloud Platform account with billing enabled
Basic familiarity with Linux command line
A domain name (for SSL setup later)
SSH access configured for GCP
Step 1: Create a GCP VM Instance
First, let’s provision a virtual machine suitable for Typesense:
gcloud compute instances create typesense-server \
    --zone=australia-southeast1-a \
    --machine-type=e2-small \
    --boot-disk-size=20GB \
    --boot-disk-type=pd-standard \
    --image-family=ubuntu-2004-lts \
    --image-project=ubuntu-os-cloud \
    --tags=typesense-server,http-server,https-server \
    --metadata=enable-oslogin=TRUE
Machine Type Considerations:
e2-micro: Free tier eligible, good for testing (2 GB RAM)
e2-small: Recommended minimum for production (2 GB RAM)
e2-medium: Better performance for larger datasets (4 GB RAM)
Typesense is memory-efficient, but your choice depends on dataset size and query volume.
Step 2: Connect to Your Instance
gcloud compute ssh typesense-server \
    --zone=australia-southeast1-a
Step 3: Install Typesense Server
Once connected, update your system and install Typesense:
# Update package lists
sudo apt update
sudo apt upgrade -y

# Download Typesense DEB package (check typesense.org for latest version)
curl -O https://dl.typesense.org/releases/26.0/typesense-server-26.0-amd64.deb

# Install the package
sudo apt install ./typesense-server-26.0-amd64.deb
The installation automatically:
Creates configuration at
/etc/typesense/typesense-server.iniGenerates a random admin API key
Sets up systemd service for auto-start
Creates data directory at
/var/lib/typesense/Creates log directory at
/var/log/typesense/
Step 4: Configure Typesense
Edit the configuration file:
sudo nano /etc/typesense/typesense-server.ini
Initial configuration:
[server]
api-address = 0.0.0.0
api-port = 8108
data-dir = /var/lib/typesense
api-key = YOUR_GENERATED_API_KEY_HERE
log-dir = /var/log/typesenseImportant: The api-address = 0.0.0.0 setting is crucial—it tells Typesense to listen on all network interfaces, not just localhost. Without this, external connections will fail.
Save your API key securely—you’ll need it for all API requests.
Step 5: Start Typesense Service
# Start the service
sudo systemctl start typesense-server

# Enable auto-start on boot
sudo systemctl enable typesense-server

# Check status
sudo systemctl status typesense-server
You should see active (running) in green.
Part 2: Network Configuration and Firewall Rules
Your Typesense server is running, but it’s not accessible from the internet yet. Let’s fix that.
Understanding GCP Firewall Rules
GCP uses a deny-all-ingress policy by default. We need to explicitly allow traffic on specific ports.
Step 1: Configure Firewall for HTTP Testing
First, let’s allow traffic on port 8108 (Typesense’s default HTTP port):
gcloud compute firewall-rules create allow-typesense-8108 \
    --network=default \
    --allow=tcp:8108 \
    --source-ranges=0.0.0.0/0 \
    --description="Allow Typesense HTTP access" \
    --priority=1000
Security Note: Using 0.0.0.0/0 allows traffic from anywhere. For production, restrict to specific IP ranges or use VPC firewall policies.
Step 2: Test Basic Connectivity
Get your VM’s external IP:
gcloud compute instances describe typesense-server \
    --zone=australia-southeast1-a \
    --format='get(networkInterfaces[0].accessConfigs[0].natIP)'
Test the connection from your local machine:
# Replace with your actual IP
curl http://VM_INTERNAL_IP:8108/health
Expected response: {"ok":true}
If you see this, congratulations! Typesense is accessible externally.
Common Connection Issues
Issue: Connection refused or timeout
Solution:
# Check if Typesense is listening on all interfaces
sudo netstat -tlnp | grep 8108
# Should show: 0.0.0.0:8108 (not 127.0.0.1:8108)

# If showing localhost only, check api-address in config
sudo cat /etc/typesense/typesense-server.ini | grep api-address
Part 3: Setting Up SSL with Let’s Encrypt
Running Typesense over HTTP is fine for testing, but production requires HTTPS. Let’s set up free SSL certificates with Let’s Encrypt.
Why SSL Matters
Firebase Extension Requirement: The official Firestore-Typesense extension requires HTTPS
Security: Encrypts API keys and search queries in transit
Trust: Browser warnings are eliminated
SEO: Search engines favor HTTPS sites
Prerequisites: Domain Configuration
You need a domain pointing to your VM. Here’s how:
Step 1: Get your VM’s external IP (from previous section)
Step 2: Configure DNS A record at your domain registrar:
Type Name Value TTL
A typesense VM_INTERNAL_IP 3600
For this guide, I’ll use typesense.YourDomain.com as an example.
Step 3: Verify DNS propagation (wait 5-10 minutes):
# Check DNS resolution
dig typesense.YourDomain.com

# Or use nslookup
nslookup typesense.YourDomain.com
Installing Certbot
Certbot is Let’s Encrypt’s official client for obtaining SSL certificates:
# Update package list
sudo apt update

# Install snapd
sudo apt install snapd -y
sudo snap install core
sudo snap refresh core

# Remove old certbot if exists
sudo apt remove certbot -y

# Install certbot via snap
sudo snap install --classic certbot

# Create symlink
sudo ln -s /snap/bin/certbot /usr/bin/certbot

# Verify installation
certbot --version
Obtaining SSL Certificates
Before requesting certificates, ensure port 443 is available:
# Stop Typesense temporarily
sudo systemctl stop typesense-server

# Allow HTTP traffic (needed for Let's Encrypt verification)
gcloud compute firewall-rules create allow-http \
    --network=default \
    --allow=tcp:80 \
    --source-ranges=0.0.0.0/0 \
    --description="Allow HTTP for SSL verification"

# Allow HTTPS traffic
gcloud compute firewall-rules create allow-https \
    --network=default \
    --allow=tcp:443 \
    --source-ranges=0.0.0.0/0 \
    --description="Allow HTTPS traffic"
Request your certificate:
sudo certbot certonly --standalone \
    -d typesense.YourDomain.com \
    --email your.email@example.com \
    --agree-tos \
    --non-interactive
Success output:
Successfully received certificate.
Certificate is saved at: /etc/letsencrypt/live/typesense.YourDomain.com/fullchain.pem
Key is saved at: /etc/letsencrypt/live/typesense.YourDomain.com/privkey.pem
This certificate expires on 2026-04-05.
Configuring Typesense with SSL
Update your Typesense configuration:
sudo nano /etc/typesense/typesense-server.iniModified configuration:
[server]
api-address = 0.0.0.0
api-port = 443
data-dir = /var/lib/typesense
api-key = YOUR_API_KEY
log-dir = /var/log/typesense

# SSL Configuration
ssl-certificate = /etc/letsencrypt/live/typesense.YourDomain.com/fullchain.pem
ssl-certificate-key = /etc/letsencrypt/live/typesense.YourDomain.com/privkey.pem

# Optional: Enable CORS for dashboard access
enable-cors = true
Fixing Certificate Permissions
Let’s Encrypt certificates are readable only by root, but Typesense runs as a service user:
# Grant read permissions
sudo chmod 755 /etc/letsencrypt/live/
sudo chmod 755 /etc/letsencrypt/archive/
sudo chmod 644 /etc/letsencrypt/live/typesense.YourDomain.com/*.pem
sudo chmod 644 /etc/letsencrypt/archive/typesense.YourDomain.com/*.pem

# Verify Typesense can read certificates
sudo -u typesense cat /etc/letsencrypt/live/typesense.YourDomain.com/fullchain.pem > /dev/null && echo "✅ Certificate readable" || echo "❌ Permission denied"
Starting Typesense with SSL
# Start Typesense
sudo systemctl start typesense-server

# Check for errors
sudo systemctl status typesense-server

# View logs if there are issues
sudo tail -f /var/log/typesense/typesense.log
Testing HTTPS Connection
# Test from local machine
curl https://typesense.YourDomain.com/health
Expected: {"ok":true} with no SSL warnings
Setting Up Auto-Renewal
Let’s Encrypt certificates expire after 90 days. Certbot automatically sets up renewal, but we need to restart Typesense after renewal:
# Create renewal hook
sudo nano /etc/letsencrypt/renewal-hooks/post/restart-typesense.sh
Add this content:
#!/bin/bash
systemctl restart typesense-server
echo "Typesense restarted after SSL renewal at $(date)" >> /var/log/typesense/ssl-renewal.log
Make it executable:
sudo chmod +x /etc/letsencrypt/renewal-hooks/post/restart-typesense.shTest renewal process:
sudo certbot renew --dry-runPart 4: Typesense Collection Schema Design
Before syncing data, we need to define our collection schema. For this guide, we’ll use a job management system as an example.
Understanding Typesense Fields
Typesense supports several field types:
string: Text fields (searchable)
int32/int64: Integer numbers
float: Decimal numbers
bool: Boolean values
string[]: Array of strings
auto: Automatically detect type
Field Properties:
facet: true- Enable filtering and aggregationoptional: true- Field may be missing in documentssort: true- Enable sorting on this field
Designing the Jobs Schema
For a job management system with nested objects (client, address), we have two approaches:
Approach 1: Flattened Schema (Recommended)
{
  "name": "jobs",
  "fields": [
    {"name": "title", "type": "string", "optional": true},
    {"name": "description", "type": "string", "optional": true},
    {"name": "status", "type": "string", "optional": true, "facet": true},
    {"name": "client.name", "type": "string", "optional": true, "facet": true},
    {"name": "client.email", "type": "string", "optional": true},
    {"name": "address.suburb", "type": "string", "optional": true, "facet": true},
    {"name": "address.state", "type": "string", "optional": true, "facet": true},
    {"name": "date", "type": "int64", "sort": true},
    {"name": "assigned_employees_uids", "type": "string[]", "optional": true, "facet": true}
  ],
  "default_sorting_field": "date"
}
Approach 2: Wildcard Schema (More Flexible)
{
  "name": "jobs",
  "fields": [
    {"name": "title", "type": "string", "optional": true},
    {"name": "description", "type": "string", "optional": true},
    {"name": "status", "type": "string", "optional": true, "facet": true},
    {"name": "date", "type": "int64", "sort": true},
    {"name": "assigned_employees_uids", "type": "string[]", "optional": true, "facet": true},
    {"name": ".*", "type": "auto", "optional": true}
  ],
  "default_sorting_field": "date"
}
The wildcard .* field automatically indexes all other fields without explicit definition.
Creating the Collection
curl https://typesense.YourDomain.com/collections \
  -X POST \
  -H "Content-Type: application/json" \
  -H "X-TYPESENSE-API-KEY: YOUR_API_KEY" \
  -d '{
    "name": "jobs",
    "fields": [
      {"name": "title", "type": "string", "optional": true},
      {"name": "description", "type": "string", "optional": true},
      {"name": "status", "type": "string", "optional": true, "facet": true},
      {"name": "date", "type": "int64", "sort": true},
      {"name": "assigned_employees_uids", "type": "string[]", "optional": true, "facet": true},
      {"name": ".*", "type": "auto", "optional": true}
    ],
    "default_sorting_field": "date"
  }'
Important Schema Rules:
The
default_sorting_fieldcannot be optionalDocument IDs are stored in the
idfield automaticallyField names with dots (e.g.,
client.name) create flattened structures
Verifying Collection Creation
# List all collections
curl https://typesense.YourDomain.com/collections \
  -H "X-TYPESENSE-API-KEY: YOUR_API_KEY" | jq

# Get specific collection details
curl https://typesense.YourDomain.com/collections/jobs \
  -H "X-TYPESENSE-API-KEY: YOUR_API_KEY" | jq
Part 5: Firebase Extension Integration
The official Typesense Firebase Extension automatically syncs Firestore changes to Typesense in real-time. This is the recommended approach—no custom Cloud Functions needed!
Why Use the Firebase Extension?
Official Support: Maintained by the Typesense team
Battle-Tested: Used by hundreds of production apps
Zero Code: No Cloud Functions to write or maintain
Auto-Retry: Built-in error handling
Backfill Support: Sync existing data with one click
Multi-Collection: Install multiple times for different collections
Installing the Extension
Via Firebase Console (Recommended):
Go to Firebase Console
Select your project
Navigate to Extensions in the left sidebar
Click Install Extension
Search for “Typesense” or visit the extension page
Click Install in Console
Via Firebase CLI:
# Install Firebase CLI if needed
npm install -g firebase-tools

# Login to Firebase
firebase login

# Install extension
firebase ext:install typesense/firestore-typesense-search \
  --project=your-project-id
Configuration Parameters
During installation, you’ll be prompted for these values:
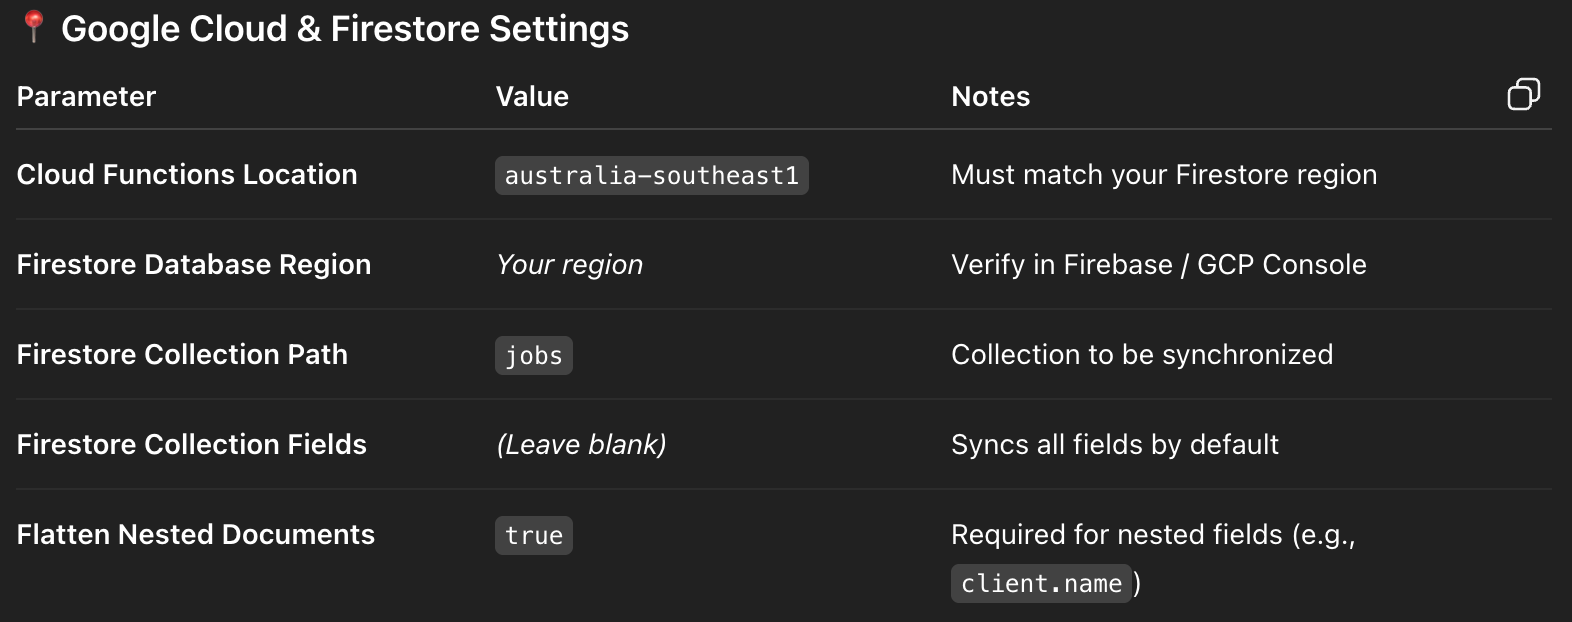
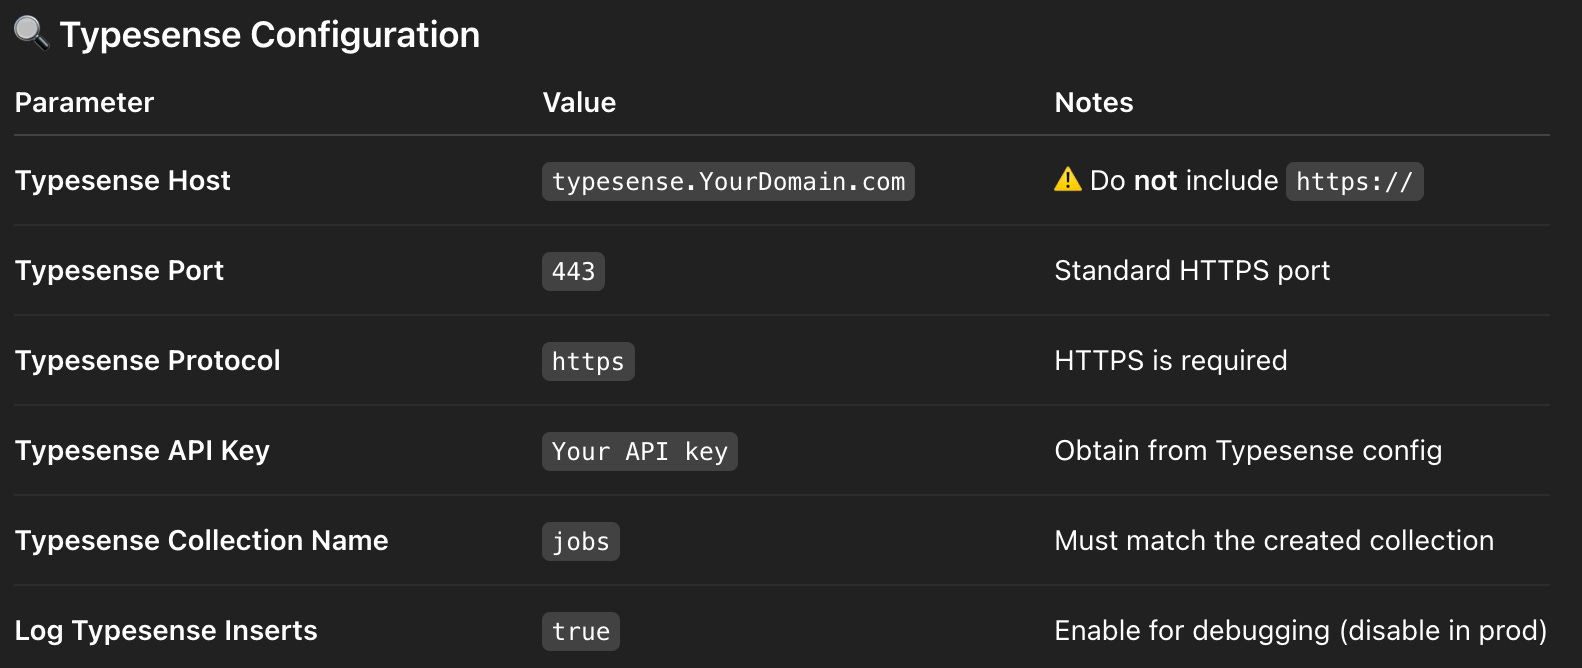
✅ Correct: VM_INTERNAL_IP with port 8108 and protocol http
Understanding Flatten Nested Documents
Your Firestore document structure:
{
  "title": "Fix door",
  "client": {
    "name": "John Doe",
    "email": "john@example.com"
  },
  "address": {
    "suburb": "Sydney",
    "state": "NSW"
  }
}
With Flatten = true, Typesense receives:
{
  "title": "Fix door",
  "client.name": "John Doe",
  "client.email": "john@example.com",
  "address.suburb": "Sydney",
  "address.state": "NSW"
}
This matches our flattened schema from Part 4.
Verifying Extension Installation
Check extension status:
# List installed extensions
firebase ext:list --project=your-project-id

# View extension logs
firebase functions:log --only ext-firestore-typesense-search \
  --project=your-project-id
In Firebase Console:
Go to Extensions
Your extension should show status: Active
Click View in Cloud Functions to see the sync function
Part 6: Backfilling Existing Data
The extension only syncs new changes automatically. To index existing documents, we need to trigger a backfill.
Method 1: Using Firestore Console (Easiest)
Open Firebase Console > Firestore Database
Create a new collection:
typesense_syncAdd a document with ID:
backfillAdd a field:
Name:
triggerType:
booleanValue:
true
Click Save
The extension detects this trigger and begins syncing all existing documents.
Method 2: Using gcloud CLI
gcloud firestore documents create typesense_sync/backfill \
  --project=your-project-id \
  --data='{"trigger":true}'
Method 3: Using Python Script
from google.cloud import firestore

db = firestore.Client()
db.collection('typesense_sync').document('backfill').set({
    'trigger': True
})
Monitoring Backfill Progress
Watch logs in real-time:
gcloud functions logs read \
  --project=your-project-id \
  --region=australia-southeast1 \
  --limit=50 \
  --follow
Check document count in Typesense:
curl "https://typesense.YourDomain.com/collections/jobs/documents/search?q=*&query_by=title&per_page=0" \
  -H "X-TYPESENSE-API-KEY: YOUR_API_KEY" | jq '.found'
Expected log output:
Upserting document abc123def456
Successfully upserted document abc123def456
Upserting document xyz789ghi012
Successfully upserted document xyz789ghi012
...
Troubleshooting Backfill Issues
Issue: “Collection not found” error
Solution: Collection must be created before backfill (see Part 4)
Issue: “Field X has been declared but not found”
Solution: Make the field optional in your schema or ensure all documents have it
Issue: “Default sorting field cannot be optional”
Solution: Remove optional: true from your date field
Re-running Backfill
To trigger backfill again:
# Set trigger to false
gcloud firestore documents update typesense_sync/backfill \
  --project=your-project-id \
  --data='{"trigger":false}'

# Wait 2-3 seconds
sleep 3

# Set trigger to true
gcloud firestore documents update typesense_sync/backfill \
  --project=your-project-id \
  --data='{"trigger":true}'
Part 7: Testing Real-Time Sync
Now that backfill is complete, let’s verify real-time synchronization works for create, update, and delete operations.
Test 1: Create Operation
Create a new document in Firestore:
gcloud firestore documents create jobs \
  --project=your-project-id \
  --data='{
    "title": "Real-time Sync Test",
    "description": "Testing Firebase Extension",
    "status": "unallocated",
    "client": {
      "name": "Test Client",
      "email": "test@example.com"
    },
    "date": 1736100000,
    "assigned_employees_uids": ["user123"]
  }'
Verify in Typesense (within 1-2 seconds):
curl "https://typesense.YourDomain.com/collections/jobs/documents/search?q=Real-time&query_by=title" \
  -H "X-TYPESENSE-API-KEY: YOUR_API_KEY" | jq '.hits[].document.title'
Expected: "Real-time Sync Test"
Test 2: Update Operation
Update an existing document:
gcloud firestore documents update jobs/DOCUMENT_ID \
  --project=your-project-id \
  --data='{"status":"inprogress"}'
Verify update in Typesense:
curl "https://typesense.YourDomain.com/collections/jobs/documents/DOCUMENT_ID" \
  -H "X-TYPESENSE-API-KEY: YOUR_API_KEY" | jq '.status'
Expected: "inprogress"
Test 3: Delete Operation
Delete a document:
gcloud firestore documents delete jobs/DOCUMENT_ID \
  --project=your-project-id
Verify deletion in Typesense:
curl "https://typesense.YourDomain.com/collections/jobs/documents/DOCUMENT_ID" \
  -H "X-TYPESENSE-API-KEY: YOUR_API_KEY"
Expected: 404 Not Found
Checking Sync Latency
Real-time sync typically completes within:
1-2 seconds for simple documents
2-5 seconds for complex nested structures
5-10 seconds during high load
Monitor extension logs to diagnose any delays.
Part 8: Advanced Typesense Operations
Faceted Search
Get aggregated counts by status:
curl "https://typesense.YourDomain.com/collections/jobs/documents/search?q=*&query_by=title&facet_by=status" \
  -H "X-TYPESENSE-API-KEY: YOUR_API_KEY" | jq '.facet_counts'
Response:
{
  "facet_counts": [
    {
      "field_name": "status",
      "counts": [
        {"value": "completed", "count": 150},
        {"value": "inprogress", "count": 45},
        {"value": "unallocated", "count": 20}
      ]
    }
  ]
}
Geospatial Search
Add location fields to your schema:
{
  "name": "location",
  "type": "geopoint",
  "optional": true
}
Search within radius:
curl "https://typesense.YourDomain.com/collections/jobs/documents/search?q=*&query_by=title&filter_by=location:(151.2099,-33.8651,5km)" \
  -H "X-TYPESENSE-API-KEY: YOUR_API_KEY"
Exporting All Data
# Export to JSONL
curl "https://typesense.YourDomain.com/collections/jobs/documents/export" \
  -H "X-TYPESENSE-API-KEY: YOUR_API_KEY" > jobs_backup.jsonl

# Count exported documents
wc -l jobs_backup.jsonl
Part 9: Production Considerations
Security Best Practices
1. Restrict Firewall Rules
Instead of 0.0.0.0/0, use specific IP ranges:
gcloud compute firewall-rules update allow-https \
    --source-ranges=YOUR_OFFICE_IP/32,YOUR_CLOUD_FUNCTION_IP/32
2. Use Scoped API Keys
Create search-only API keys for frontend:
curl 'https://typesense.YourDomain.com/keys' \
  -X POST \
  -H "X-TYPESENSE-API-KEY: YOUR_ADMIN_KEY" \
  -H 'Content-Type: application/json' \
  -d '{
    "description": "Search-only key for frontend",
    "actions": ["documents:search"],
    "collections": ["jobs"]
  }'
3. Enable Rate Limiting
Use Nginx as a reverse proxy:
limit_req_zone $binary_remote_addr zone=typesense:10m rate=10r/s;

server {
    listen 443 ssl;
    server_name typesense.YourDomain.com;

    location / {
        limit_req zone=typesense burst=20;
        proxy_pass https://localhost:8108;
    }
}
Monitoring and Logging
1. Check Typesense Stats
curl "https://typesense.YourDomain.com/stats.json" \
  -H "X-TYPESENSE-API-KEY: YOUR_API_KEY" | jq
2. Monitor Cloud Function Metrics
Firebase Console > Functions > Metrics
Track invocations, errors, and execution time
3. Set Up Alerts
gcloud alpha monitoring policies create \
  --notification-channels=YOUR_CHANNEL_ID \
  --display-name="Typesense VM Down" \
  --condition-display-name="VM Instance Down" \
  --condition-threshold-value=0 \
  --condition-threshold-duration=300s
Backup Strategy
1. Automated Backups
Create a cron job:
# /etc/cron.daily/typesense-backup.sh
#!/bin/bash
DATE=$(date +%Y%m%d)
curl "https://typesense.YourDomain.com/collections/jobs/documents/export" \
  -H "X-TYPESENSE-API-KEY: $API_KEY" \
  | gzip > /backups/jobs_${DATE}.jsonl.gz

# Keep only last 7 days
find /backups -name "jobs_*.jsonl.gz" -mtime +7 -delete
2. Cloud Storage Backups
# Upload to GCS
gsutil cp /backups/jobs_$(date +%Y%m%d).jsonl.gz \
  gs://your-bucket/typesense-backups/
Scaling Considerations
When to Scale Up:
Query latency > 100ms consistently
Memory usage > 80%
CPU usage > 70%
Vertical Scaling:
# Upgrade to larger machine type
gcloud compute instances set-machine-type typesense-server \
    --machine-type=e2-medium \
    --zone=australia-southeast1-a
Horizontal Scaling (Clustering):
For multi-node setup:
Create 3+ VM instances
Configure each with
--nodesparameterUse load balancer for distribution
Part 10: Troubleshooting Guide
Issue: “Collection not found”
Cause: Collection doesn’t exist in Typesense
Solution:
# Check collections
curl "https://typesense.YourDomain.com/collections" \
  -H "X-TYPESENSE-API-KEY: YOUR_API_KEY"

# Create if missing (see Part 4)
Issue: “Field X has been declared but not found”
Cause: Document missing required field
Solution: Make field optional in schema:
{"name": "field_name", "type": "string", "optional": true}Issue: Firebase Extension not syncing
Check logs:
firebase functions:log --only ext-firestore-typesense-searchCommon causes:
Wrong hostname format (remove https://)
Firewall blocking Cloud Functions IP
Collection doesn’t exist
Schema mismatch
Issue: SSL certificate expired
Renew manually:
sudo systemctl stop typesense-server
sudo certbot renew
sudo systemctl start typesense-server
Issue: High memory usage
Clear cache:
# Restart Typesense
sudo systemctl restart typesense-server

# Check memory
free -h
Conclusion
Congratulations! You’ve built a production-ready search infrastructure from scratch. Let’s recap what you’ve accomplished:
✅ Self-hosted Typesense on GCP with full control
✅ SSL/HTTPS with auto-renewing Let’s Encrypt certificates
✅ Real-time sync via Firebase Extension
✅ FastAPI integration with graceful fallbacks
✅ Production-ready with monitoring and backups
Cost Breakdown
Monthly costs for this setup:
GCP e2-small VM: ~$15/month
Bandwidth: ~$1-5/month (first 1GB free)
Domain: ~$1/month (if annual)
Total: ~$17-21/month
Compare to:
Algolia: $29+/month
Elasticsearch Cloud: $45+/month
Typesense Cloud: $29+/month
You’re saving 40-60% while maintaining full control!